HOW TO ENABLE SELECTIVE SHUT-OFF FOR AZURE VIRTUAL MACHINES

Azure Virtual Machines (VMs) are a popular choice for running applications and services in the cloud. However, running VMs 24/7 can be expensive, especially if you are not using them all the time. This is where selective shut-off of Azure VMs comes into play. By shutting down VMs during off-hours or when they are not needed, you can reduce the amount of compute and storage resources used and save on the associated costs.
In this article, we will cover the technical steps for enabling selective shut-off of Azure VMs using Azure Automation by exploring the following topics:
- Setting up an Azure Automation account
- Creating a new runbook in Azure Automation
- Adding PowerShell commands to the runbook
- Scheduling the runbook to start and stop VMs
Setting Up an Azure Automation Account
The first step in enabling selective shut-off of Azure VMs is to set up an Azure Automation account. Azure Automation is a cloud-based service that allows you to automate repetitive and time-consuming tasks in your Azure environment. To set up an Azure Automation account, follow these steps:
- Log in to the Azure portal and navigate to the Azure Automation service.
- Click on the “Add” button to create a new Automation account.
- Enter the required information for the Automation account, such as the name, subscription, and resource group.
- Choose the desired pricing tier for the Automation account. The pricing tier determines the number of runbook minutes and the maximum number of runbooks that can be created in the account.
- Choose the desired region for the Automation account.
- Click on the “Create” button to create the Automation account.
Creating a New Runbook in Azure Automation
Once you have set up the Azure Automation account, the next step is to create a new runbook. A runbook is a set of instructions or scripts that automate tasks in Azure, such as starting and stopping VMs. To create a new runbook, follow these steps:
- Navigate to the Runbooks section in the Azure Automation account.
- Click on the “Add a runbook” button to create a new runbook.
- Choose the desired type of runbook, such as PowerShell, Python, or Graphical.
- Enter the required information for the runbook, such as the name and description.
- Click on the “Create” button to create the runbook.
Adding PowerShell Commands to the Runbook
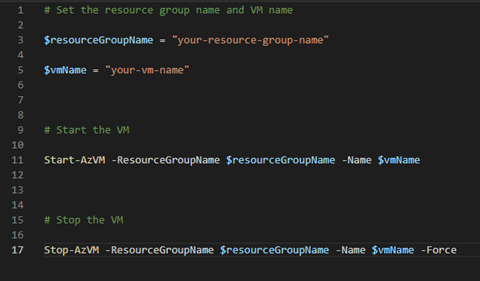
After you have created the new runbook, the next step is to add PowerShell commands to the runbook that start and stop the VMs. You can use the Start-AzVM and Stop-AzVM cmdlets to start/stop VMs and filter the VMs based on specific criteria, such as VM name, resource group, or tag.
For example, the following PowerShell commands start and stop VMs based on their resource group name:

You can customize the PowerShell commands to match your specific requirements, such as filtering VMs based on their location, size, or status.
Scheduling the Runbook to Start & Stop VMs
After you have added the necessary PowerShell commands to the runbook, the next step is to schedule the runbook to start and stop the VMs at specific times. To schedule the runbook, follow these steps:
- Click on the “Schedules” section in the left-hand menu of the runbook.
- Click on the “Add a schedule” button to create a new schedule.
- Choose the desired frequency and interval for running the runbook, such as daily, weekly, or monthly.
- Specify the start time and time zone for the schedule.
- Configure any other options for the schedule, such as runbook parameters or advanced settings.
- Click on the “Create” button to create the schedule.
- Monitor the runbook and schedule to ensure that the runbook is running as expected and that the desired tasks are being performed.
Reaping the Benefits
In summary, selective shut-off of Azure VMs is a cost-saving technique that can help you to reduce your Azure bill, optimize your resource usage, improve performance, increase flexibility, and control costs. By using this technique, you can manage your Azure environment more efficiently and effectively, and turn your focus toward higher-priority tasks aimed at achieving better business outcomes.
