VMWARE CLOUD ON AWS: CONFIGURING HCX ON NSX-T SDDC WITH DIRECT CONNECT

VMware Cloud on AWS is evolving on a weekly—maybe even daily—basis. So, not unexpectedly, one of the foundational components of VMware Cloud on AWS—NSX—has also undergone transformational change. The original release of VMware Cloud on AWS was underpinned by NSX-V, a tried and true SDN solution. However, VMware recognized that NSX needed to support more than just vSphere—and that it also needed to meet the demands of web-scale environments like AWS. So, NSX-T was born and it’s now the default for VMware Cloud on AWS. In addition to NSX-T, VMware has also expanded the connectivity options for VMware Cloud on AWS.
With an NSX-V-based VMware Cloud SDDC, connectivity to the Management Gateway (MGW) and the Compute Gateway (CGW) had to run across separate connections. In this scenario, only ESXi Management, cold migration or network file copy/NFC, along with live migration/vMotion traffic is supported across a Direct Connect. All other traffic, like management appliance traffic (e.g. vCenter, HCX Cloud Manager, etc.) and compute/workload traffic, is carried over VPN connected to the public side of the SDDC VPC.
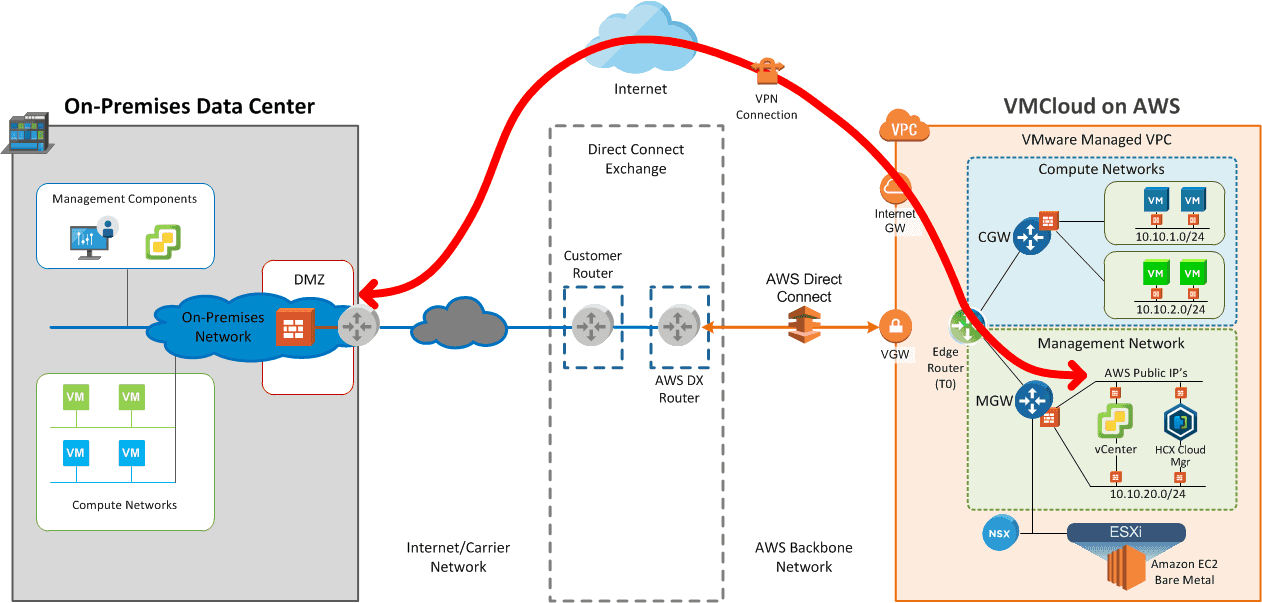
Now, with the NSX-T-based VMware Cloud SDDC, all traffic to the Management Gateway and the Compute Gateway can be passed across a Direct Connect.
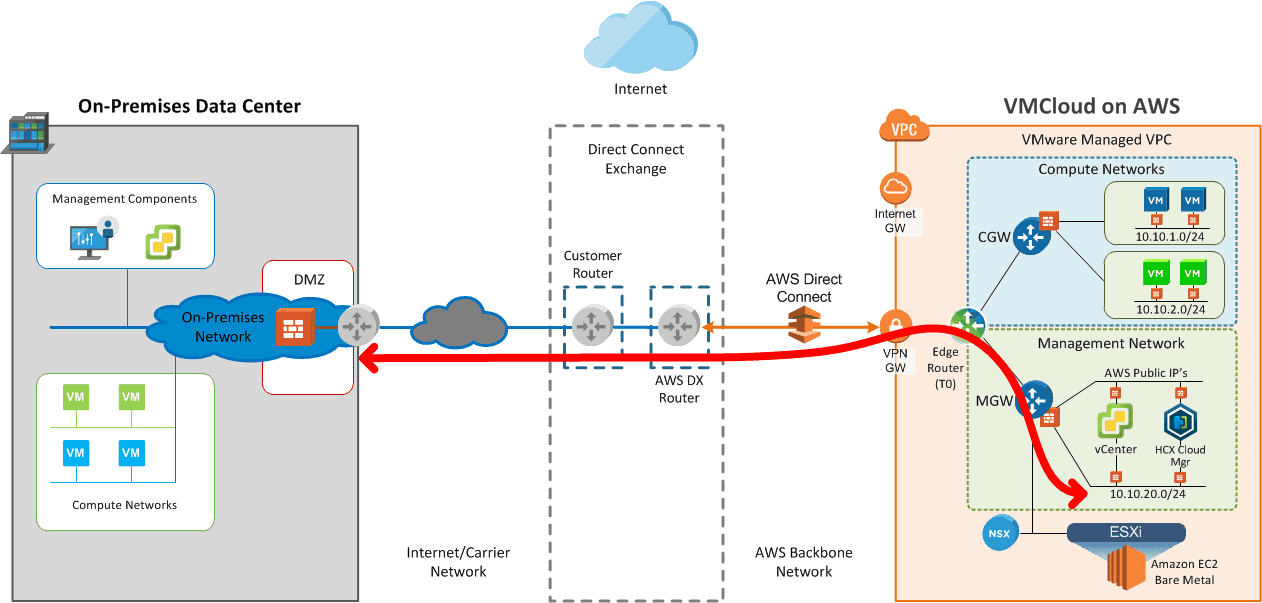
Overview
When switching to a Direct Connect-only design, there are some things that need to be considered. For example, when you try to access the SDDC vCenter for configuring things like HLM or when trying to access the HCX Cloud Manager after it is deployed—both of which default to using their Public interface for management access when they are deployed—you will likely need to reconfigure which interface they use for communication with your on-premises data center.
Changing the configuration for the SDDC vCenter to have it resolve to its Private Interface—versus its Public Interface—is fairly easy to do. You simply go into the “Settings” section of the VMware Cloud Console and change the vCenter FQDN to use the Private IP that is assigned.
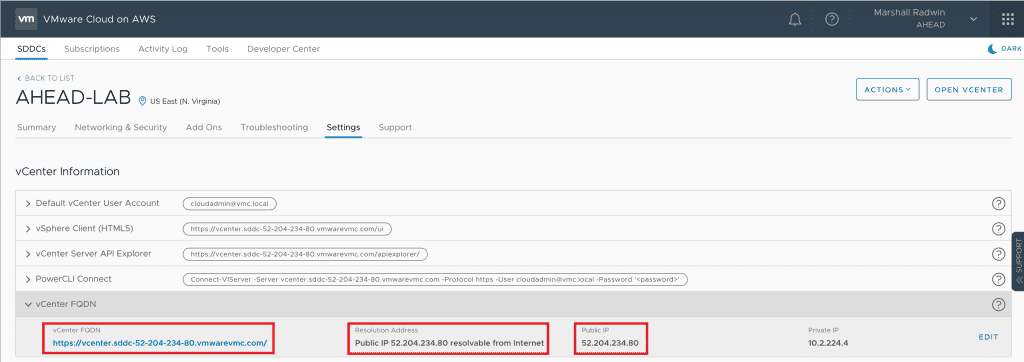
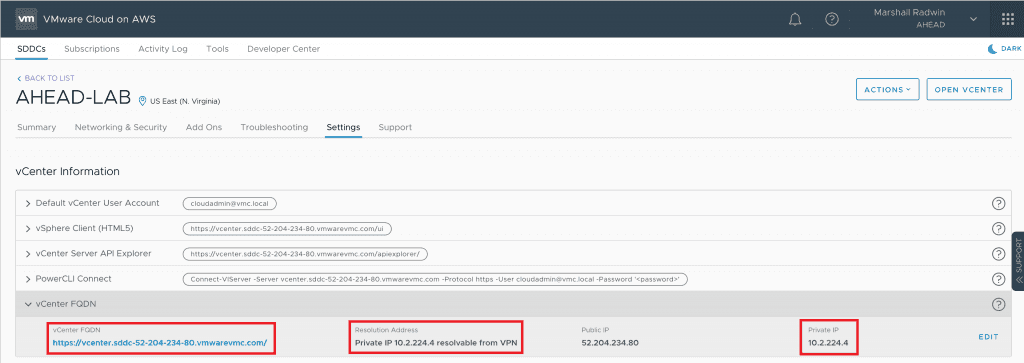
A temporary workaround for this is to go into the VMware Cloud SDDC vCenter (not the VMware Cloud Console) and find the Private IP for the hcx_cloud_manager VM under Hosts and Clusters and use that to connect to the HCX Cloud Console in your web browser (It should be something like https://<vm_local_ip>/hybridity/ui/services-1.0/hcx-cloud/index.html#/login).
Assuming all else is correct with routing between your on-premises data center and the VMware Cloud SDDC, you should be able to successfully access the HCX Cloud Management Console.
Note: If you’re using a VPN that has split tunnel disabled to execute all of the configuration (like I do), additional routing and name resolution configuration may need to be done to pass traffic from the SDDC back to the data center (through the AWS Direct Connect) and then through the VPN.
I’ll break the tasks for getting everything configured and working into two sections. The first section covers what is provided in the VMware documentation, along with some clarification on several of the configuration steps. The second section will outline some additional steps that will need to be taken to configure the Edge Firewall (a.k.a., the Gateway Firewall) that are not documented as of this time.
Step 1: Configuration Steps
Follow the configuration steps listed in the Configuring HCX for Direct Connect Private Virtual Interfaces section of the VMware NSX Hybrid Connect User Guide here.
The documentation below shows the procedure for re-configuring the HCX Interconnect as follows:
- Log in to the VMware Cloud Console at vmware.com.
- On the Add-ons tab of your SDDC, click “OPEN HYBRID CLOUD EXTENSION” on the Hybrid Cloud Extension card.
- Navigate to the SDDCs tab and click “OPEN HCX.”
- Enter the administrator@vmc.local user and credentials and click “LOG IN.” (Note: In the current release, this procedure requires a VMware Support account, in the upcoming release, the cloud administrator will be able to perform this operation).
- Navigate to the Interconnect Configuration section of the Administration tab and click Edit.
- Locate the Network Profile with Type: Internet and click the X to delete it.
- Create a Network Profile:
- Select the “Distributed Portgroup” Network Type
- Select the “Direct Connect Network” Network Type
- Enter the private IP address ranges reserved for HCX.
- Enter the Prefix Length and the Gateway IP address.
- Click Next and then click Finish.
The first issue you will probably need to address is when you reach step three of the configuration tasks, you are instructed to “Open HCX”. In my case—because I connect to the VMC SDDC through a VPN that has Split Tunnel disabled—I wasn’t able to connect to the HCX Console via its Public Interface to complete the configuration. There are also some other scenarios where you may not be able to access the HCX Console, as well. For instance, if you’re not able to access the Internet from where you are connected to your on-premises data center.
As I mentioned earlier, you can use the Private Interface IP to access the HCX Cloud Console, but ideally, you will want that to work as intended when you click the “Open HCX” button in the VMware Hybrid Cloud Extension UI.
In order to access the HCX Cloud Console on its Private interface, some changes need to be made to force HCX to pass all traffic across the Direct Connect—including console traffic. This is where things get a little confusing.
Based on the instructions in the VMware documentation (as shown above) the procedure makes sense until you reach steps 4 – 8, where you end up in a bit of a chicken-and-egg situation. In order for HCX to send all traffic over the Direct Connect, you need to reconfigure the Interconnect interface which requires you to login to the HCX Cloud console as administrator@vmc.local: “Wait … neither customers nor partners are given administrator@vmc.local credentials”.
Next, when it says, “This procedure requires a VMware Support account,” does that mean if I’m listed as a support contact for my company’s VMware account, I should be able to do this? The answer to that question is, well, no.
What all of that actually means is, you will need to contact VMware’s VMware Cloud Support team to make the change—at least until they make that capability available for the “cloudadmin” account. The easiest—and fastest—way to do this is through the online chat support in the VMware Cloud Console. When you’re ready to proceed with step 4 (above), you’ll need to make sure you have already removed any HCX Interconnects that were previously deployed for the specific VMware Cloud SDDC you’re working with. This is because those components will need to be re-deployed once you get to the on-premises portion of the HCX deployment. VMware support will also ask you to confirm that any previously deploy HCX Interconnects for this SDDC have been removed and will then ask for the CIDR range you want to use with HCX.
Once you have provided VMware Cloud Support with the pertinent information, they will make the changes on the backend, which usually takes 2-to-4 hours.
But wait…there’s more!
In addition to the changes VMware Cloud Support needs to make to have HCX Cloud use the Direct Connect, there are some other changes that will need to be made in the Gateway Firewall.
Step 2: Configuration Steps
In order for the HCX Enterprise Manager—that you will deploy in your on-premises data center—and the HCX Provider to communicate with the HCX Cloud Manager, there are some Edge Firewall rules that will need to be configured.
First, you will need to create entries in the Networking & Security > Inventory > Groups > Management Groups section for the HCX activation and update servers (connect.hcx.vmware.com and hybridity-depot.vmware.com) to use with the rules for allowing the HCX Cloud Manager to communicate with the Mothership (shown below).
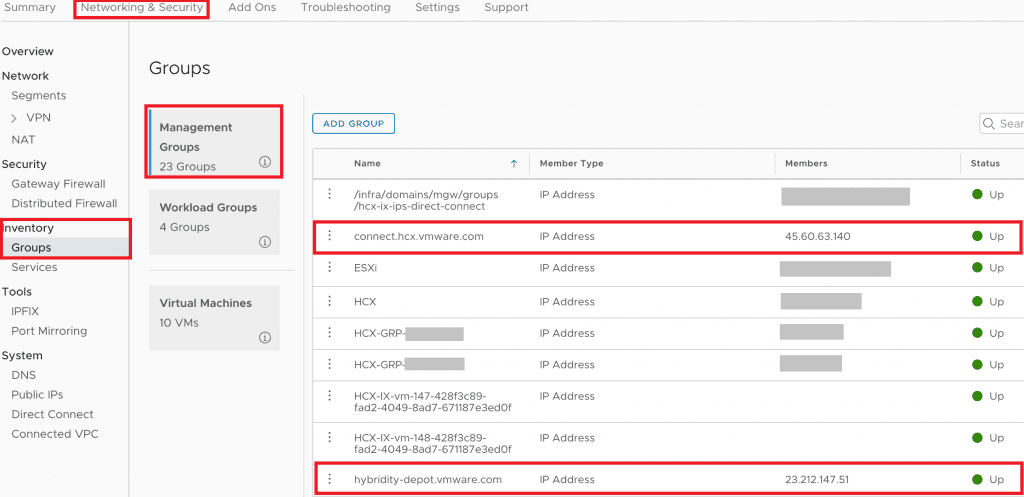
Second, you will want to create a rule in the SDDC Gateway Firewall that allows your the HCX Cloud Manager to communicate on port TCP-443 to the HCX provider sites you just created for activation and updates. (Note: The image shows “ANY” as the services, but 443 is all that is needed).

 Third, you will create a rule in the Management Gateway Firewall that allows inbound access from your on-premises networks (the ones where the HCX Enterprise components will reside and any that will be stretched by HCX to the VMware Cloud SDDC).

Next, you will create a Gateway Firewall rule that allows inbound access to the HCX Cloud Manager from external (in this case ANY) on port TCP-443.

One final note, particularly if your VMware Cloud SDDC has been configured to use on-premises DNS servers, make sure all of the other solutions that are deployed to support on-premises to VMC failover, DR or migration (e.g. SRM, vR, etc.) are configured to use the Private IP address of the corresponding components hosted in the VMware Cloud SDDC.
(This blog post by Marshall Radwin originally appeared on Virtual Insanity.)
